The Legend of Mir
Connecting to The Legend of Mir
- - > Download The Legend of Mir < - -
Welcome to The Legend of Mir!
Listed below is a user-friendly step-by-step tutorial
on how to setup your files quickly and easily.
Connecting to The Legend of Mir
- - > Download The Legend of Mir < - -
Welcome to The Legend of Mir!
Listed below is a user-friendly step-by-step tutorial
on how to setup your files quickly and easily.
1. Downloading the Auto Patcher
Step 1:
Click the "Download The Legend of Mir" link above, or head to http://thelegendofmir.com/download/.
Once your download has finished, hit "Run". (or "Save" if you wish to keep a copy of the installer on your computer)
Step 2:
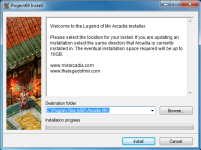
Install the auto patcher.
By default, your Legend of Mir root folder will be installed to "C:\Program Files x86\Legend of Mir 2", if you wish to change where you want these files to be installed, simply hit "Browse..." and select a destination of your choice.
The Auto Patcher should load and begin installing your files automatically.
2. Setting up the Auto Patcher
Step 1:
Once the Auto Patcher has finished the installation process, open up your Legend of Mir root folder. (The place where you installed it to)
Should look something similar to this.*
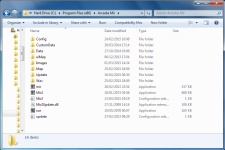
* - Your folder may look different to mine, it may have more or less items inside it but don't worry, your auto patcher should give you what you need.
Step 2:
In this folder, you may find a variety of different things. Most are irrelevant and thus, we don't need to mess with.
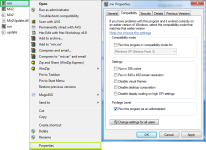
Right-Click the "mir.exe" application.
Select "Properties".
Select the "Compatibility" menu.
Tick the box "Run this program as an administrator".
Click "Apply" and "OK".
3. Optimising your Game
While this may not be a requirement for most people, this may boost your gameplay performance.
Step 1:
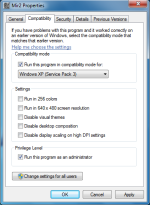
Similar to how we granted our Auto Patcher administrators rights, we will be doing the same here but also altering the game's compatibility settings.
Right-Click the "Mir2.exe" application. (The one below the "mir.exe" - refer to the image above)
Select "Properties".
Select the "Compatibility" menu.
Tick the box "Run this program as an administrator".
Also, tick the "Run this program in compatibility mode for:".
... and select "Windows XP (Service Pack 3)".
Click "Apply" and "OK".
4. Anti-Virus Software
Many Anti-Virus that you may have on your PC will often attempt to remove the "mir.exe" application as they believe this "unknown" program to be 'malicious'.
We can assure you that this application is NOT a virus of any kind and is completely safe to use.
Most AV Software will come with an "Exceptions" feature. This allows the user to add a file/program etc., which the AV perceives as a threat, to an "Exceptions list" where the AV Software will be unable to remove the file from the computer without the users permission.
With this is mind, in order for you to be able to successfully launch mir.exe Auto Patcher, you will most likely be required to add this program to your AV's Exceptions List so it doesn't delete it.
Listed below is several Anti-Virus Software Guides which will tell you how to add a program to the exceptions list.
If your AV Software is not on the list below, simply search in Google "<Name of your AV Software> how to add exceptions" or something along those lines.
How to Add an Exception/Exclusion:
Let me know if you believe any of the information is incorrect
or inaccurate and I will try to rectify the errors as soon as possible.
- AVG - McAfee - Avast - Avira - BullGuard - Kaspersky Lab - Windows Defender (Microsoft) -
- BitDefender - Check Point - IObit - Sophos - Norton Anti-Virus -
Let me know if you believe any of the information is incorrect
or inaccurate and I will try to rectify the errors as soon as possible.
Last edited by a moderator:


